If you are searching about Chapter 5: Add a button – Arduino to Go you've came to the right page. We have 17 Pictures about Chapter 5: Add a button – Arduino to Go like Button | Arduino, Wiring The Cable: Arduino Button Wiring Diagram and also One Button to Rule Them All - Arduino Project Hub. Read more:
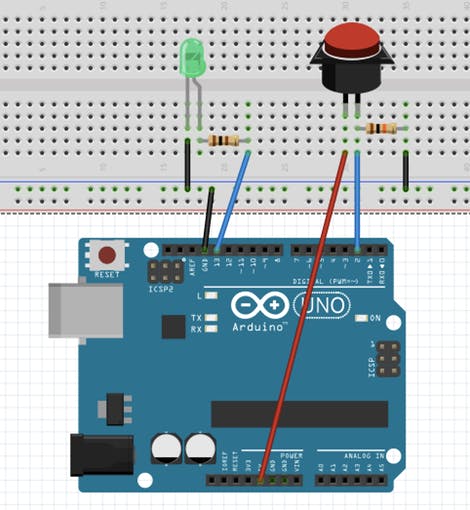
Chapter 5: Add A Button – Arduino To Go
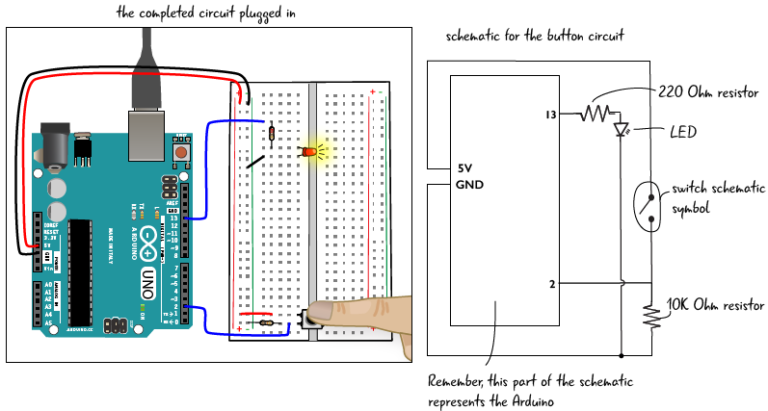 arduinotogo.com
 Detect Objects With Camera And Arduino | Microcontroller Tutorials
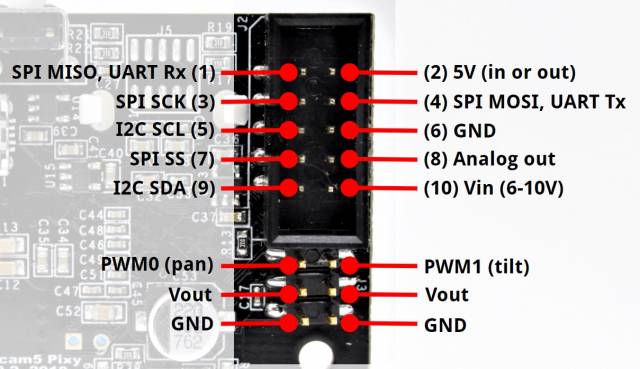 www.teachmemicro.com
 camera pixy arduino pixy2 pinout pixycam objects detect power wiki powering v2 docs unregulated
Arduino - Jpralves.net
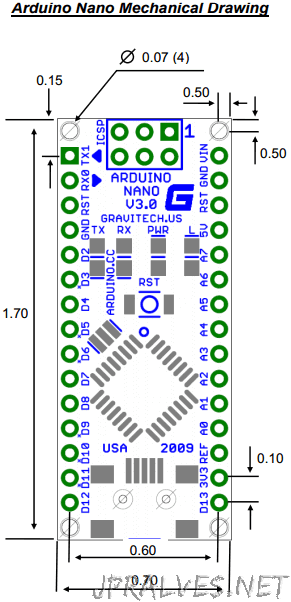 jpralves.net
 dimensions arduino nano jpralves
Arduino Joystick Module Example – 42 Bots
 42bots.com
 joystick arduino module example wiring diagram motor stepper thumbstick code cablage robot cnc
Button | Arduino
 www.arduino.cc
 Arduino Rotary Encoder Interface
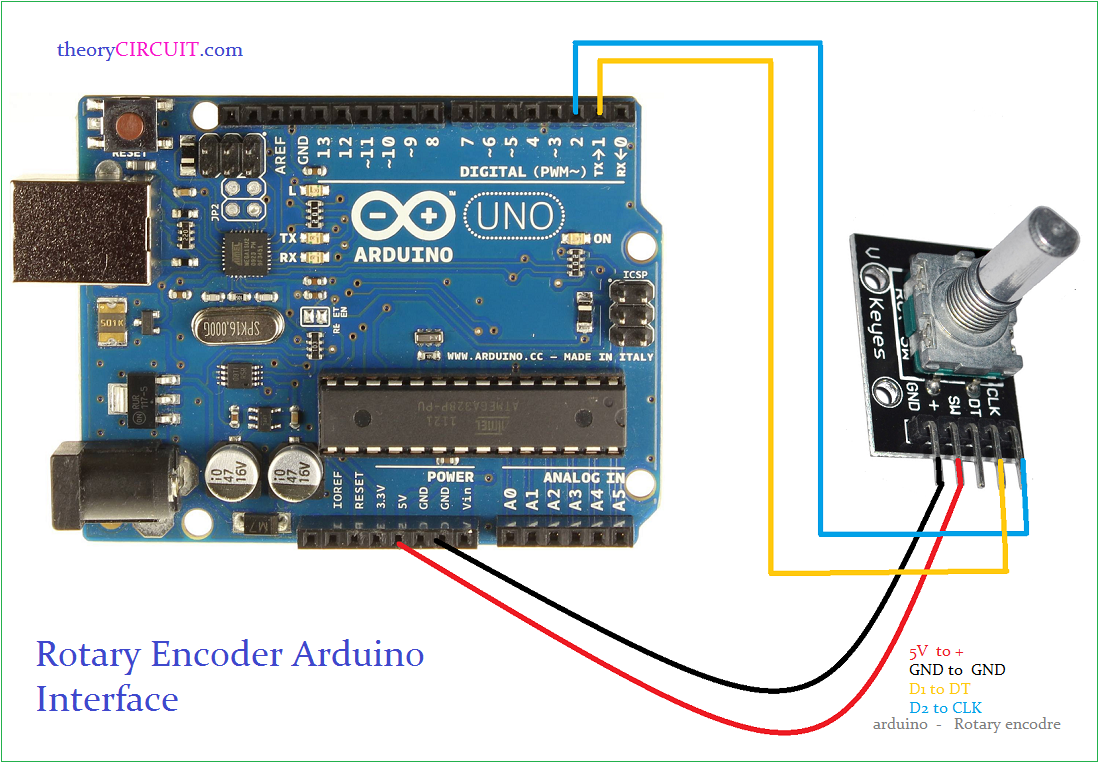 theorycircuit.com
 encoder arduino rotary interface theorycircuit connect pins previous
4 Digit 7 Segment Display Stopwatch : 3 Steps - Instructables
 www.instructables.com
 segment stopwatch
Arduino Lilypad Remote Mouse | Next Project
 www.nextproject.ca
 lilypad arduino uno connect programming mouse project
Wiring The Cable: Arduino Button Wiring Diagram
 wiringdcable.blogspot.com
 One Button To Rule Them All - Arduino Project Hub
 create.arduino.cc
 Tutorial 14: Using Buttons With Arduino
 www.circuitcrush.com
 Chapter 5: Add Two More Buttons And Adjust The Code – Arduino To Go
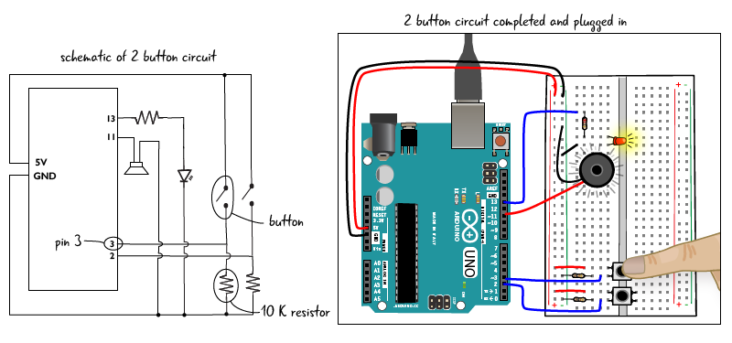 arduinotogo.com
 Button: Arduino Basics - Arduino Project Hub
 create.arduino.cc
 button arduino circuit serial monitor led sketch basics resistor project hook file pulldown power
Tactile Tact Switch Momentary Push Button Switch 4 Pin Dip For Arduino
 www.alibaba.com
 switch tact push button tactile arduino momentary smd smt type pcb dip
Arduino Uno - Unstable Reading From Pushbutton On Digital Pin - Arduino
 arduino.stackexchange.com
 arduino button pushbutton digital tutorial cc unstable reading uno mistake gnd isn didn peter thanks looks
OZEKI - How To Use A Button Controller In Arduino
 www.ozeki.hu
 arduino ozeki 2976
Arduino Wemos D1 Pinout - Google Search | Electronic Circuit Projects
 www.pinterest.com
 d1 esp8266 wemos arduino r1 wifi uno pinout esp 12e esp32 ch340 processor di footprint circuit development capture cam send
Arduino lilypad remote mouse. Wiring the cable: arduino button wiring diagram. Tactile tact switch momentary push button switch 4 pin dip for arduino
if you are looking "id":631,"keyword_id":19,"name":"arduino button pinout","scraped_at":"2022-12-08 03:12:45","created_at":"2022-12-08T03:12:45.000000Z","updated_at":"2022-12-08T03:12:45.000000Z","images":[ Arduino","thumbnail":"https:\/\/tse2.mm.bing.net\/th?id=OIP.i-Zxgg2AytNM_FOyRpZZRgAAAA&pid=15.1","size":"200 x 113 \u00b7 png","desc":"","filetype":"png","width":200,"height":113,"domain":"www.arduino.cc","created_at":null,"updated_at":null,"id":11975,"keyword_id":631,"url":"https:\/\/i.stack.imgur.com\/g6oHI.png","link":"https:\/\/wiringdcable.blogspot.com\/2020\/04\/arduino-button-wiring-diagram.html","title":"Wiring The Cable: Arduino Button Wiring Diagram","thumbnail":"https:\/\/tse4.mm.bing.net\/th?id=OIP.7YZS3HXeCImaoKm63g-XPQHaE1&pid=15.1","size":"1776 x 1158 \u00b7 png","desc":"","filetype":"png","width":1776,"height":1158,"domain":"wiringdcable.blogspot.com","created_at":null,"updated_at":null,"id":11976,"keyword_id":631,"url":"https:\/\/hackster.imgix.net\/uploads\/image\/file\/168986\/arduino-button.png?auto=compress%2Cformat&w=680&h=510&fit=max","link":"https:\/\/create.arduino.cc\/projecthub\/glowascii\/button-arduino-basics-5ecffc","title":"Button: Arduino Basics - Arduino Project Hub","thumbnail":"https:\/\/tse1.mm.bing.net\/th?id=OIP.m9uXB0p1D8LYFes7yHLa0gAAAA&pid=15.1","size":"470 x 510 \u00b7 jpeg","desc":"button arduino circuit serial monitor led sketch basics resistor project hook file pulldown power","filetype":"jpg","width":470,"height":510,"domain":"create.arduino.cc","created_at":null,"updated_at":null,"id":11977,"keyword_id":631,"url":"http:\/\/www.ozeki.hu\/attachments\/2976\/button-wiring-diagram.png","link":"http:\/\/www.ozeki.hu\/p_2976-how-to-use-a-button-controller-in-arduino.html","title":"OZEKI - How to use a button controller in arduino","thumbnail":"https:\/\/tse2.mm.bing.net\/th?id=OIP.KKMtI8wyE2_8Vg9yYZwEIwHaDD&pid=15.1","size":"624 x 258 \u00b7 png","desc":"arduino ozeki 2976","filetype":"png","width":624,"height":258,"domain":"www.ozeki.hu","created_at":null,"updated_at":null,"id":11978,"keyword_id":631,"url":"http:\/\/arduino.cc\/en\/uploads\/Tutorial\/button.png","link":"http:\/\/arduino.stackexchange.com\/questions\/3425\/unstable-reading-from-pushbutton-on-digital-pin","title":"arduino uno - Unstable reading from pushbutton on digital pin - Arduino","thumbnail":"https:\/\/tse1.mm.bing.net\/th?id=OIP.h1oB-dIKV2rNW3l05jOTOQHaC4&pid=15.1","size":"729 x 283 \u00b7 png","desc":"arduino button pushbutton digital tutorial cc unstable reading uno mistake gnd isn didn peter thanks looks","filetype":"png","width":729,"height":283,"domain":"arduino.stackexchange.com","created_at":null,"updated_at":null,"id":11979,"keyword_id":631,"url":"https:\/\/hacksterio.s3.amazonaws.com\/uploads\/image_file\/file\/139446\/schema.png","link":"https:\/\/create.arduino.cc\/projecthub\/Arduino_Genuino\/one-button-to-rule-them-all-915bbe","title":"One Button to Rule Them All - Arduino Project Hub","thumbnail":"https:\/\/tse4.mm.bing.net\/th?id=OIP.t0HB7bHO8Ecul5d8Q9wuPQHaFQ&pid=15.1","size":"996 x 708 \u00b7 png","desc":"","filetype":"png","width":996,"height":708,"domain":"create.arduino.cc","created_at":null,"updated_at":null,"id":11980,"keyword_id":631,"url":"https:\/\/www.circuitcrush.com\/wp-content\/uploads\/How-to-Use-Buttons-with-Arduino-450x543.jpg","link":"https:\/\/www.circuitcrush.com\/tutorial-14-using-buttons-arduino\/","title":"Tutorial 14: Using Buttons with Arduino","thumbnail":"https:\/\/tse4.mm.bing.net\/th?id=OIP.25eHsvDmBcWhYtAxcrl3XgAAAA&pid=15.1","size":"450 x 543 \u00b7 jpeg","desc":"","filetype":"jpg","width":450,"height":543,"domain":"www.circuitcrush.com","created_at":null,"updated_at":null,"id":11981,"keyword_id":631,"url":"https:\/\/arduinotogo.com\/wp-content\/uploads\/2016\/08\/ch5-2-button-schematic-final-01-732x343.png","link":"https:\/\/arduinotogo.com\/2016\/10\/08\/chapter-5-add-2-more-buttons-and-adjust-the-code\/","title":"Chapter 5: Add two more buttons and adjust the code \u2013 Arduino to Go","thumbnail":"https:\/\/tse1.mm.bing.net\/th?id=OIP.bV5XrTFdjLrT6-uueOujjAHaDe&pid=15.1","size":"732 x 343 \u00b7 png","desc":"","filetype":"png","width":732,"height":343,"domain":"arduinotogo.com","created_at":null,"updated_at":null, Electronic circuit projects","thumbnail":"https:\/\/tse2.mm.bing.net\/th?id=OIP.-IAerbxw6IENV0xDc42X7wHaFj&pid=15.1","size":"736 x 552 \u00b7 jpeg","desc":"d1 esp8266 wemos arduino r1 wifi uno pinout esp 12e esp32 ch340 processor di footprint circuit development capture cam send","filetype":"jpg","width":736,"height":552,"domain":"www.pinterest.com","created_at":null,"updated_at":null,"id":11983,"keyword_id":631,"url":"https:\/\/content.instructables.com\/ORIG\/F4Q\/G3XQ\/JX0NXTEX\/F4QG3XQJX0NXTEX.jpg?auto=webp&frame=1&width=2100","link":"https:\/\/www.instructables.com\/id\/4-Digit-7-Segment-Display-Stopwatch\/","title":"4 Digit 7 Segment Display Stopwatch : 3 Steps - Instructables","thumbnail":"https:\/\/tse4.mm.bing.net\/th?id=OIP.rMhKox5Hxzes5WFIGjbo7AHaI4&pid=15.1","size":"2040 x 2448 \u00b7 jpeg","desc":"segment stopwatch","filetype":"jpg","width":2040,"height":2448,"domain":"www.instructables.com","created_at":null,"updated_at":null,"id":11984,"keyword_id":631,"url":"https:\/\/theorycircuit.com\/wp-content\/uploads\/2018\/02\/rotary-encoder-arduino-interface.png","link":"https:\/\/theorycircuit.com\/arduino-rotary-encoder-interface\/","title":"Arduino Rotary Encoder Interface","thumbnail":"https:\/\/tse1.mm.bing.net\/th?id=OIP.m6-CtUTSRJoqZ7ER2-kW7gHaFK&pid=15.1","size":"1100 x 766 \u00b7 png","desc":"encoder arduino rotary interface theorycircuit connect pins previous","filetype":"png","width":1100,"height":766,"domain":"theorycircuit.com","created_at":null,"updated_at":null,"id":11985,"keyword_id":631,"url":"http:\/\/42bots.com\/wp-content\/uploads\/2014\/10\/Arduino_Joystick-wiring-diagram.png","link":"http:\/\/42bots.com\/tutorials\/arduino-joystick-module-example\/","title":"Arduino Joystick Module Example \u2013 42 Bots","thumbnail":"https:\/\/tse1.mm.bing.net\/th?id=OIP.cBSrBgkEUZuzDvBc2yzZwAHaF8&pid=15.1","size":"748 x 600 \u00b7 png","desc":"joystick arduino module example wiring diagram motor stepper thumbstick code cablage robot cnc","filetype":"png","width":748,"height":600,"domain":"42bots.com","created_at":null,"updated_at":null,"id":11986,"keyword_id":631,"url":"https:\/\/arduinotogo.com\/wp-content\/uploads\/2016\/08\/ch5-1-button-led-circuit-schematic-01-768x411.png","link":"http:\/\/arduinotogo.com\/2016\/10\/08\/chapter-5-add-a-button\/","title":"Chapter 5: Add a button \u2013 Arduino to Go","thumbnail":"https:\/\/tse3.mm.bing.net\/th?id=OIP.vQpqZj0JReR2Ar1BJhDz6AHaD9&pid=15.1","size":"768 x 411 \u00b7 png","desc":"","filetype":"png","width":768,"height":411,"domain":"arduinotogo.com","created_at":null,"updated_at":null, Next Project","thumbnail":"https:\/\/tse1.mm.bing.net\/th?id=OIP.PBOtPr4eHshdaDFkWVIn7AHaPu&pid=15.1","size":"440 x 934 \u00b7 jpeg","desc":"lilypad arduino uno connect programming mouse project","filetype":"jpg","width":440,"height":934,"domain":"www.nextproject.ca","created_at":null,"updated_at":null,"id":11988,"keyword_id":631,"url":"https:\/\/jpralves.net\/img\/mcb\/nano_dimensions_12.png","link":"https:\/\/jpralves.net\/post\/2016\/11\/15\/arduino.html","title":"Arduino - jpralves.net","thumbnail":"https:\/\/tse4.mm.bing.net\/th?id=OIP.0BMYrEr8UZG3PqMEzrqJ8AAAAA&pid=15.1","size":"291 x 602 \u00b7 png","desc":"dimensions arduino nano jpralves","filetype":"png","width":291,"height":602,"domain":"jpralves.net","created_at":null,"updated_at":null,"id":11989,"keyword_id":631,"url":"https:\/\/sc02.alicdn.com\/kf\/HTB1lsHKPVXXXXbVaXXXq6xXFXXXN\/230104419\/HTB1lsHKPVXXXXbVaXXXq6xXFXXXN.jpg","link":"https:\/\/www.alibaba.com\/product-detail\/Tactile-Tact-Switch-Momentary-Push-Button_60618214513.html","title":"Tactile Tact Switch Momentary Push Button Switch 4 Pin Dip For Arduino","thumbnail":"https:\/\/tse2.mm.bing.net\/th?id=OIP.Auw2S3NJgNTdDohTykuhUwHaKs&pid=15.1","size":"1000 x 1445 \u00b7 jpeg","desc":"switch tact push button tactile arduino momentary smd smt type pcb dip","filetype":"jpg","width":1000,"height":1445,"domain":"www.alibaba.com","created_at":null,"updated_at":null, Microcontroller Tutorials","thumbnail":"https:\/\/tse2.mm.bing.net\/th?id=OIP.ny4eHn9S0rqjvMEQGcXyUAHaER&pid=15.1","size":"640 x 369 \u00b7 jpeg","desc":"camera pixy arduino pixy2 pinout pixycam objects detect power wiki powering v2 docs unregulated","filetype":"jpg","width":640,"height":369,"domain":"www.teachmemicro.com","created_at":null,"updated_at":null] this site you are coming to the right page. Contains many images about arduino button pinout Dimensions arduino nano jpralves. Don't forget to bookmark this page for future reference or share to facebook / twitter if you like this page.


Comments
Post a Comment