If you are searching about IOT : Starting ESP8266 NodeMcu with Arduino IDE you've came to the right page. We have 8 Pictures about IOT : Starting ESP8266 NodeMcu with Arduino IDE like Decoding and Encoding JSON Arduino | Random Nerd Tutorials, WiFiManager with ESP8266 - Autoconnect, Custom Parameter and Manage and also IOT : Starting ESP8266 NodeMcu with Arduino IDE. Here it is:
IOT : Starting ESP8266 NodeMcu With Arduino IDE
 rajendroid.blogspot.com
 esp8266 nodemcu arduino ide mcu pinout
Program ESP32-CAM Using Arduino UNO - Electronics Projects
 easyelectronicsproject.com
 arduino esp32cam esp32 circuit easyelectronicsproject
Decoding And Encoding JSON Arduino | Random Nerd Tutorials
 randomnerdtutorials.com
 json arduino featured encoding decoding lab electronics esp8266 randomnerdtutorials
TAMING The FREEBOARD IoT DASHBOARD – — The Black Magic Boxes
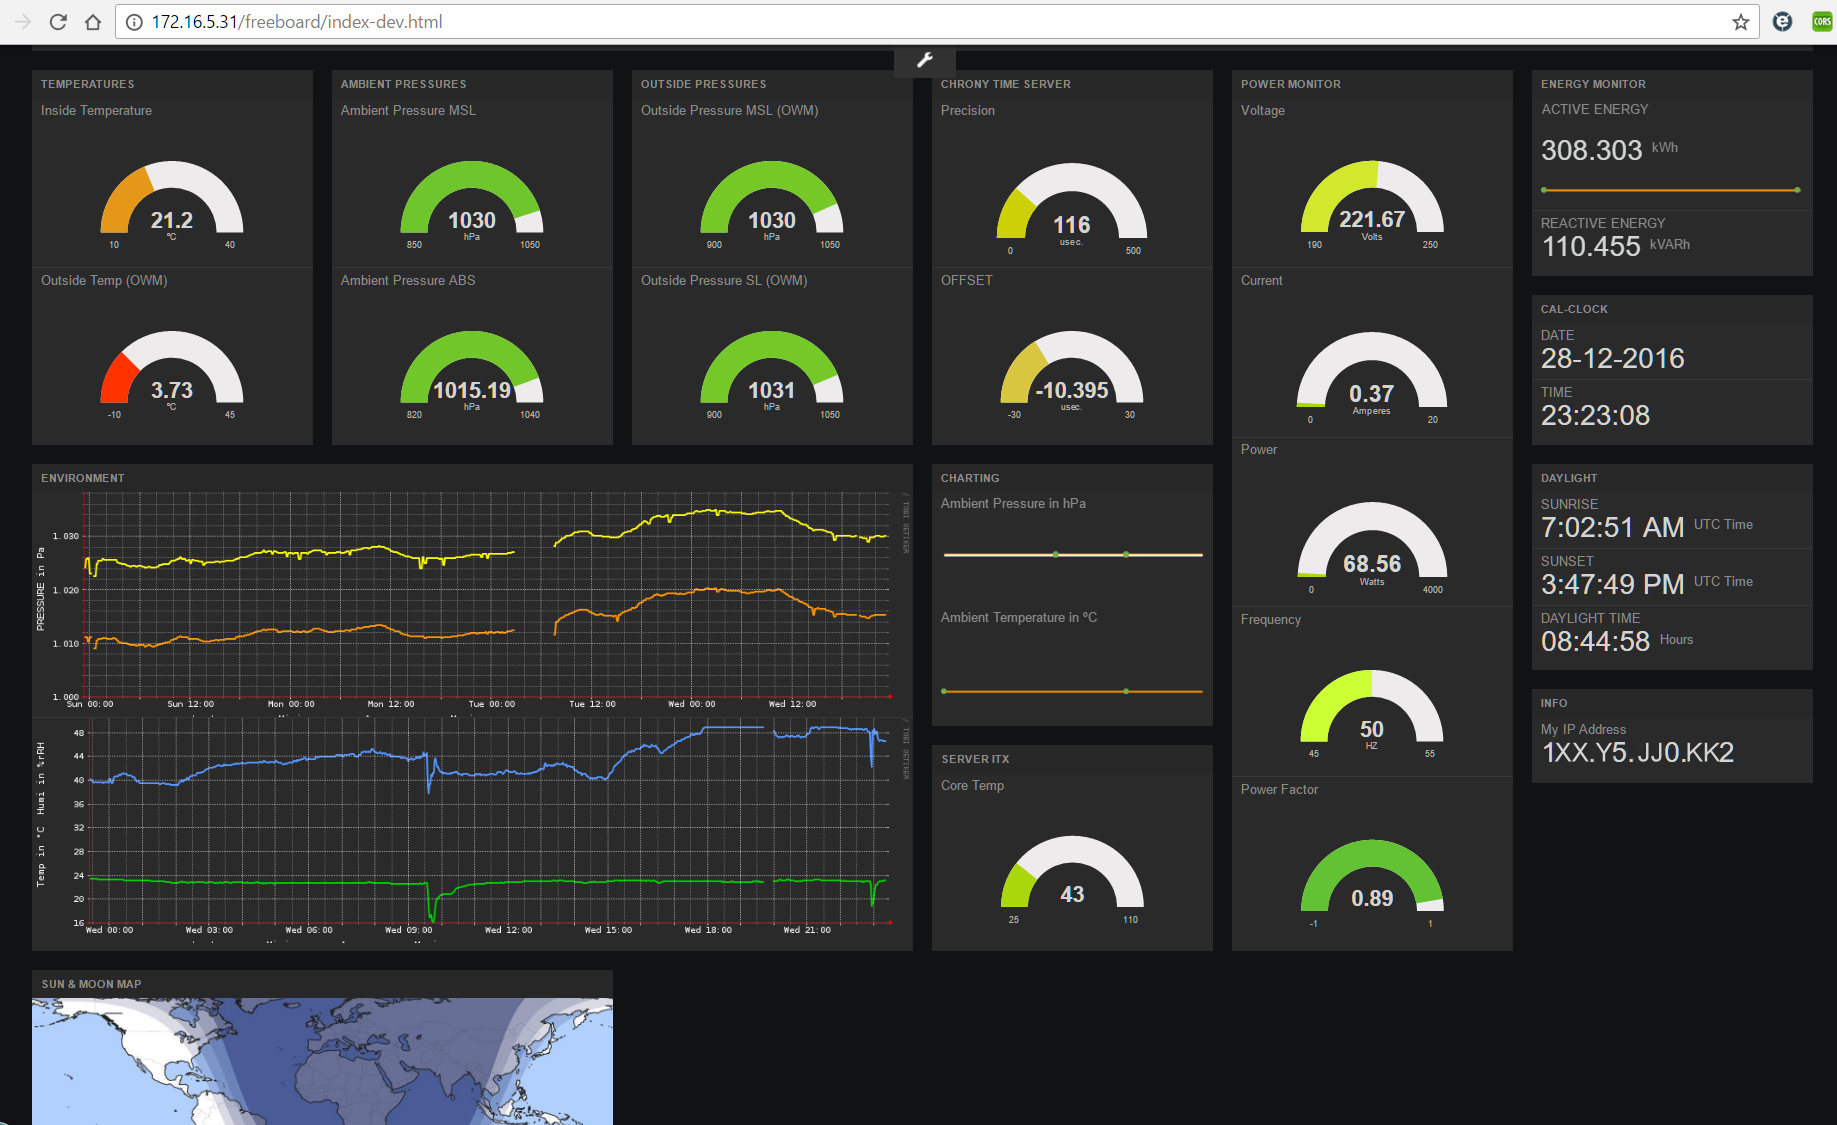 www.blackmagicboxes.com
 dashboard freeboard iot taming json configuration initial file
WiFiManager With ESP8266 - Autoconnect, Custom Parameter And Manage
 randomnerdtutorials.com
 esp8266 wifimanager password wifi autoconnect arduino ssid esp32 manager parameter manage custom ws2812b randomnerdtutorials rgb works choose
Créer Un Baromètre Numérique : Wemos D1 Mini (ESP8266) + BMP180
 www.projetsdiy.fr
 Programar ESP8266 Con Arduino IDE En 5 Minutos - PDAControl
 pdacontroles.com
 esp8266 programar pinout minutos
ESP8266 (Web Server - Part 5): How To Use Google Charts To Display
 www.pinterest.fr
 esp8266 bootstrap interface spiffs dht22 diyprojects bmp180 wemos походження статті
Wifimanager with esp8266. Arduino esp32cam esp32 circuit easyelectronicsproject. Programar esp8266 con arduino ide en 5 minutos
if you are looking "id":82,"keyword_id":null,"name":"arduino json esp8266","scraped_at":"2022-12-08 03:12:38","created_at":"2022-12-08T03:12:33.000000Z","updated_at":"2022-12-08T03:12:38.000000Z","images":[ Random Nerd Tutorials","thumbnail":"https:\/\/tse3.mm.bing.net\/th?id=OIP.JZxD5TwcUy08qPBTVxTN6AHaDz&pid=15.1","size":"1146 x 588 \u00b7 png","desc":"json arduino featured encoding decoding lab electronics esp8266 randomnerdtutorials","filetype":"png","width":1146,"height":588,"domain":"randomnerdtutorials.com","created_at":null,"updated_at":null,"id":1566,"keyword_id":82,"url":"https:\/\/i1.wp.com\/randomnerdtutorials.com\/wp-content\/uploads\/2018\/02\/Wi-fi-manager-thumbnail.jpg?resize=1280%2C720&ssl=1","link":"https:\/\/randomnerdtutorials.com\/wifimanager-with-esp8266-autoconnect-custom-parameter-and-manage-your-ssid-and-password\/","title":"WiFiManager with ESP8266 - Autoconnect, Custom Parameter and Manage","thumbnail":"https:\/\/tse3.mm.bing.net\/th?id=OIP.r1lTyuMxblYMCu10DnVaowHaEK&pid=15.1","size":"1280 x 720 \u00b7 jpeg","desc":"esp8266 wifimanager password wifi autoconnect arduino ssid esp32 manager parameter manage custom ws2812b randomnerdtutorials rgb works choose","filetype":"jpg","width":1280,"height":720,"domain":"randomnerdtutorials.com","created_at":null,"updated_at":null,"id":1567,"keyword_id":82,"url":"https:\/\/1.bp.blogspot.com\/--b07Re2XQ5o\/WIsU0nJVy-I\/AAAAAAAAAJU\/La4RtetRAo4MM5KaQ8I57ykC4XSohe-IgCLcB\/s1600\/esp8266-node-mcu-pinout.png","link":"https:\/\/rajendroid.blogspot.com\/2017\/01\/iot-starting-esp8266-nodemcu-with.html","title":"IOT : Starting ESP8266 NodeMcu with Arduino IDE","thumbnail":"https:\/\/tse3.mm.bing.net\/th?id=OIP.oyCH2UJoHsyDIIE3dh2ZhAHaGP&pid=15.1","size":"700 x 590 \u00b7 png","desc":"esp8266 nodemcu arduino ide mcu pinout","filetype":"png","width":700,"height":590,"domain":"rajendroid.blogspot.com","created_at":null,"updated_at":null,"id":1568,"keyword_id":82,"url":"https:\/\/i.pinimg.com\/originals\/f1\/12\/ae\/f112ae9b66324cf738e18c315c504fee.jpg","link":"https:\/\/www.pinterest.fr\/pin\/572449802628605566\/","title":"ESP8266 (Web Server - Part 5): how to use Google Charts to display","thumbnail":"https:\/\/tse3.mm.bing.net\/th?id=OIP._z0G2ZfHe6jmaVatzwdMlgHaEo&pid=15.1","size":"1298 x 812 \u00b7 jpeg","desc":"esp8266 bootstrap interface spiffs dht22 diyprojects bmp180 wemos \u043f\u043e\u0445\u043e\u0434\u0436\u0435\u043d\u043d\u044f \u0441\u0442\u0430\u0442\u0442\u0456","filetype":"jpg","width":1298,"height":812,"domain":"www.pinterest.fr","created_at":null,"updated_at":null,"id":1569,"keyword_id":82,"url":"https:\/\/www.blackmagicboxes.com\/wp-content\/uploads\/2016\/12\/FREEBOARD_1.png","link":"https:\/\/www.blackmagicboxes.com\/?p=416","title":"TAMING the FREEBOARD IoT DASHBOARD \u2013 \u2014 The Black Magic Boxes","thumbnail":"https:\/\/tse2.mm.bing.net\/th?id=OIP.j-ewmS5-gBL0Wn6vTa3AmgHaEi&pid=15.1","size":"1837 x 1125 \u00b7 png","desc":"dashboard freeboard iot taming json configuration initial file","filetype":"png","width":1837,"height":1125,"domain":"www.blackmagicboxes.com","created_at":null,"updated_at":null,"id":1570,"keyword_id":82,"url":"http:\/\/www.projetsdiy.fr\/wp-content\/uploads\/2016\/06\/ESP8266-BMP180-BMP085-Wemos-d1-mini.jpg","link":"http:\/\/www.projetsdiy.fr\/esp8266-bmp180-barometre-numerique\/","title":"Cr\u00e9er un barom\u00e8tre num\u00e9rique : Wemos D1 Mini (ESP8266) + BMP180","thumbnail":"https:\/\/tse1.mm.bing.net\/th?id=OIP.iLND1fRMRJbm8XCMH1BXCQHaE_&pid=15.1","size":"1024 x 690 \u00b7 jpeg","desc":"","filetype":"jpg","width":1024,"height":690,"domain":"www.projetsdiy.fr","created_at":null,"updated_at":null,"id":1571,"keyword_id":82,"url":"https:\/\/easyelectronicsproject.com\/wp-content\/uploads\/2020\/06\/esp32cam-arduino-circuit.jpg?x31681","link":"https:\/\/easyelectronicsproject.com\/esp32-projects\/program-esp32cam-arduino\/","title":"Program ESP32-CAM using Arduino UNO - Electronics Projects","thumbnail":"https:\/\/tse2.mm.bing.net\/th?id=OIP.elGzJgwqOwpb5seBxx4znwHaEK&pid=15.1","size":"1024 x 576 \u00b7 jpeg","desc":"arduino esp32cam esp32 circuit easyelectronicsproject","filetype":"jpg","width":1024,"height":576,"domain":"easyelectronicsproject.com","created_at":null,"updated_at":null,"id":1572,"keyword_id":82,"url":"https:\/\/1.bp.blogspot.com\/-CxMGZG6Pa_Y\/V2V1AVGV2xI\/AAAAAAAABaU\/7Dib_UylOlcSK4kHHFmJmpIFVeu7Sr0cACKgB\/s1600\/Default.JPG","link":"http:\/\/pdacontroles.com\/programar-esp8266-con-arduino-ide-en-5\/","title":"Programar ESP8266 con Arduino IDE en 5 minutos - PDAControl","thumbnail":"https:\/\/tse2.mm.bing.net\/th?id=OIP.92JGW-1hEVP4QbBRt3b0nAHaD4&pid=15.1","size":"1409 x 739 \u00b7 jpeg","desc":"esp8266 programar pinout minutos","filetype":"jpg","width":1409,"height":739,"domain":"pdacontroles.com","created_at":null,"updated_at":null] this site you are coming to the right page. Contains many images about arduino json esp8266 Dashboard freeboard iot taming json configuration initial file. Don't forget to bookmark this page for future reference or share to facebook / twitter if you like this page.


Comments
Post a Comment